The following notes provide some tips for users of Mac OS X & OS X Server.
Anyone who has purchased an Mac mini Server will have likely experienced the frustration of trying to establish software RAID mirroring of the two 500GB disks. In theory this should be a very simple process:
Using "Disk Utility" Tool the process should be:
Then once you have your single RAID disk up you can clone (I use Carbon Copy Cloner) the boot disk to the new single Disk RAID. Then you should be able to add your prior "old boot disk" into the RAID configuraiton and "Hey Presto" nice redundent RAID configuration for data protection against disk failure.
I have found that this never appears to work (sorry Steve {thank you and rest in peace}, but it this is not a case of "... it just works!" ), with the most common problem being that the Create button never gets enabled (undimmed) to allow you to create the disk.
I have resorted to using the "diskutil" command line tool instead....
This provides the set of appleRAID options which can be used to trivally create RAID volumes from existing HFS volumes and has a 100% success rate and avoids the frustration of trying to get UI tool to work.
The following set of commands can be used to create and configure a RAID volume:
# diskutil appleRAID enable mirror <VolumeName> { the <VolumeName> will be "Untitled" if you have just done an erase on the second disk }

  # diskutil appleRAID update AutoRebuild 1 <VolumeName> { set the auto rebuild option for new RAID configuration }
Having converted the second disk over to mirrored RAID configuration you can then clone the current boot disk to the new RAID disk.
Then once clone is complete, reboot your machine off cloned RAID disk.
Then using "Disk Utility" again wipe the original boot disk and add the disk into RAID set.
If you set the AutoRebuild option as per above then it should then start a RAID disk rebuild process, which will take a few hours to complete.
NOTE: Using the command line option will result in 32K "chunksize" for your RAID volume and once this has been created you cannot change it. I found that using the appleRAID update command allows you to change the ChunkSize, but does not change the corresponding disk layout to be consistent with this and so you will end up with an invalid disk that will fail on reboot. Most testing has shown that changing the ChunkSize does not really have much performance benefits.
Back in the days for OS X Snow Leopard Server, Apple included a applicaton "Mobile Access Gateway", which supported a number of Network Application Proxies for:
The set of proxy servers supported establishing an Access Gateway Server on the publicly accessible Internet which then forwarded requests to private internal servers, with the advange of providing a central control point and authentication while doing away with the need to create VPN connections.
When Apple introduced OS X Lion Server the Mobile Access Gateway product as quitely dumped... which meant that any one using it would have found. that if they upgraded their Access Gateway to Lion, then all their external device connectivity would have been broken!
Another aspect of the Mobile Access Gateway, was that it handled the authentication service for the various proxies via its Open Directory. The simplest way to ensure the Access Gateway had account information required for Authentication was by replicating the Open Directory master onto the Gateway box. Keeping an Open Directory replica has a number of advantatages, including: credential consistency between internal and external access systems and ensures that your directory data is held in multiple locations to avoid the potential data loss in the event that your master machine crashes.
However, one of the major incompatabilities between Snow Leopard & Lion Server is between the Open Directory instances. So if you happened to upgrade the machine that runs your Open Directory Master, then you have have also found, that you cannot replicate between a Lion Open Directory master and a Snow Leopard replica anymore.
Having been caught in this situation as a result of upgrading a Snow Leopard Server to Lion, I have been running a number of cobbled together manual steps and hacks to keep a Snow Leopard Mobile Access Gateway going, pending getting a solution, that would replace and retire the Mobile Access Gateway.
I have now got part way through solving the problem using the "Delegate Proxy". Delegate is an Open Source Proxy application that is highly configurable generic proxy and so should be able to do everything that the "Mobile Access Gateway" does.
Here are lessons learnt and configuration tips for others who have the same problem.
Firstly, see below an illustration of the topology of the example network which I have worked on and which I suspect is pretty reflective of how many others have setup Internal & External networks and systems:
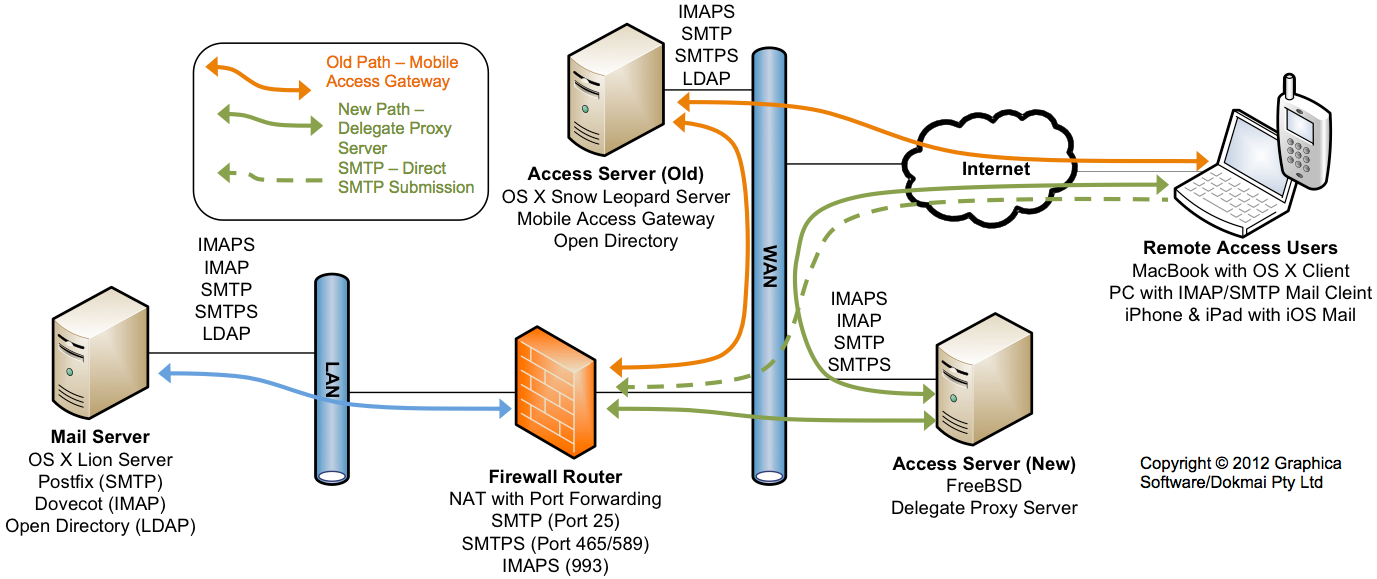
In this network there is a DMZ zone (WAN) which is connected to the Internet.
The Acess Server is in the DMZ and originally was OS X Snow Leopard Server running Mobile Access Gateway (Old).
External uses can connect to the Mobile Server via Internet using IMAPS (for mail collection) and SMTP (for mail submission).
The objective of the Delegate based solution is to retire the Snow Leopard Server based Access Server with a new FreeBSD based Delegate Server (New).
Here are steps I have gone through to "Retire" the "Mobile Access Gateway":
| 1 | Establish a FreeBSD Server and install the Delegate port. In my case to do this I created a new VMWare Fusion FreeBSD Virtual Machine. To install Deletate use FreeBSD Ports to download, compile and install the required software: OpenSSL - to provide SSL/TLS support Delegate - provide the proxy gateway NOTE: I am sure there are equivalent Linux packages to allow a Linux variant to be created |
| 2 | Configure the delegate server by editing the startup file in /usr/local/etc/rc.d/delegated.sh Delegate is a highly configurable proxy, so it is hard to now how it should be configured. In my example network, all external access requests should go the the Delegate Access Server and then they need to get redirected to the "Firewall Router". In the next few steps I provide the sample Delegate configurations used to allow Delegate to take over from the "Mobile Access Gateway" |
| 2a | Delegate startup for IMAPS proxy. This establishes IMAPS (IMAP via SSL) application proxy on Port 993 (the standard port for IMAP SSL) and forward this to the "Firewall Router" port 993 which in turn port forwards it to IMAPS on Port 993 on "Mail Server" which is within private network.
The important items are:
NOTE: The digital certificates that will be used by the Proxy server should be stored in the ${DGROOT}/etc/certs directory, with ${DGROOT} == /var/spool/delegate-nobody on FreeBSD (see item 3 below for more information on digtial certificates. TESTED: Tested and works with: OS X 10.7.4 Mail Client, iPhone/iPad iOS 5.1.1 |
| 2b | Delegate startup for SMTP proxy. This establishes an SMTPS (SMTP via SSL) application proxy on Port 993 (the standard port for SMTP SSL) and forward this to the "Firewall Router" port 857 which in turn port forwards it to SMTPS on Port 857 on "Mail Server" which is within private network.
The important items are:
NOTE: that originally I used the MOUNT syntax as per IMAP example above, but found that this did not appear to work, so I used the SERVER="smtp://<to>:<port>" configuration, which resulted in successful forwarding of SMTP traffic. TESTED: Tested and works with: OS X 10.7.4 Mail Client |
| 2c | Experimental Delegate startup for SMTP proxy with iOS SMTP (for email submission) Due to problems with the (2b) configuraiton above and iOS I have been experimenting with alternative configuration via the old SMTPS SSL port 465. I have been trying various options including using: tcprelay, going from SMTPS to SMTP (within and without STARTTLS) to see if I can get iOS email Submission to work. I will update once I have managed to get SMTP email submission working. At this stage I cannot understand why OS X Lion Mail client works but iOS does not.
The important items are:
NOTE: This configuration is still being tested to try to address problems with the SMTPS proxy configuration above (2b) and iOS devices. TESTED: Testing with: iPhone/iPad iOS 5.1.1 to try to fix problem with SMTP email submission, but still not working. See item (6) below for alternate work around |
| 2d | Delegate startup for CalDav (Calendar Server) tcprelay proxy. This establishes an CalDAV (Calendar via SSL) tcprelay proxy on Port 8443 (the standard port for Apple Calendar SSL server) and forwards this to "Firewall Router" port 8008 which in turn port forwards it to the non-SSL Calendar server Port 8008 on "Mail Server" which is within private network.
The important items are:
NOTE: The reason for going from SSL/TLS based port is due to problems with the original Mobile Access Gateway, where I was not able to get the proxy to correctly authenticate when either the Calendar or Address requests where proxied through to SSL based services TESTED: Tested and works with: OS X 10.7.4 Mail Client, iPhone/iPad iOS 5.1.1 |
| 2e | Delegate startup for CardDav (Calendar Server) tcprelay proxy. This establishes an CardDAV (Address via SSL) tcprelay proxy on Port 8443 (the standard port for Apple Address SSL server) and forwards this to "Firewall Router" port 8800 which in turn port forwards it to the non-SSL Address server Port 8800 on "Mail Server" which is within private network.
The important items are:
NOTE: Note that both CalDAV and CardDav use HTTP/HTTPS as communications protocol, so these should also be configurable via HTTP proxy. TESTED: Tested and works with: OS X 10.7.4 Mail Client, iPhone/iPad iOS 5.1.1 |
| 3 | You will need to configure your Delegate proxy SSL certificates, if you want to use a certificate from a Trusted provider. This requires that you place two certificates into the ${DGROOT}/etc/certs. On FreeBSD ${DGROOT} == /var/spool/delegate-nobody The certificates required are:
It is that simple... |
| 4 | The final step is to configure the startup file, so Delegate starts automatically on reboot. The file on FreeBSD is in: /etc/rc.conf Simply add the line:
|
| 5 | Here is the standard Delegate startup script, which is in /ustr/local/etc/rc.d/delegated.sh |
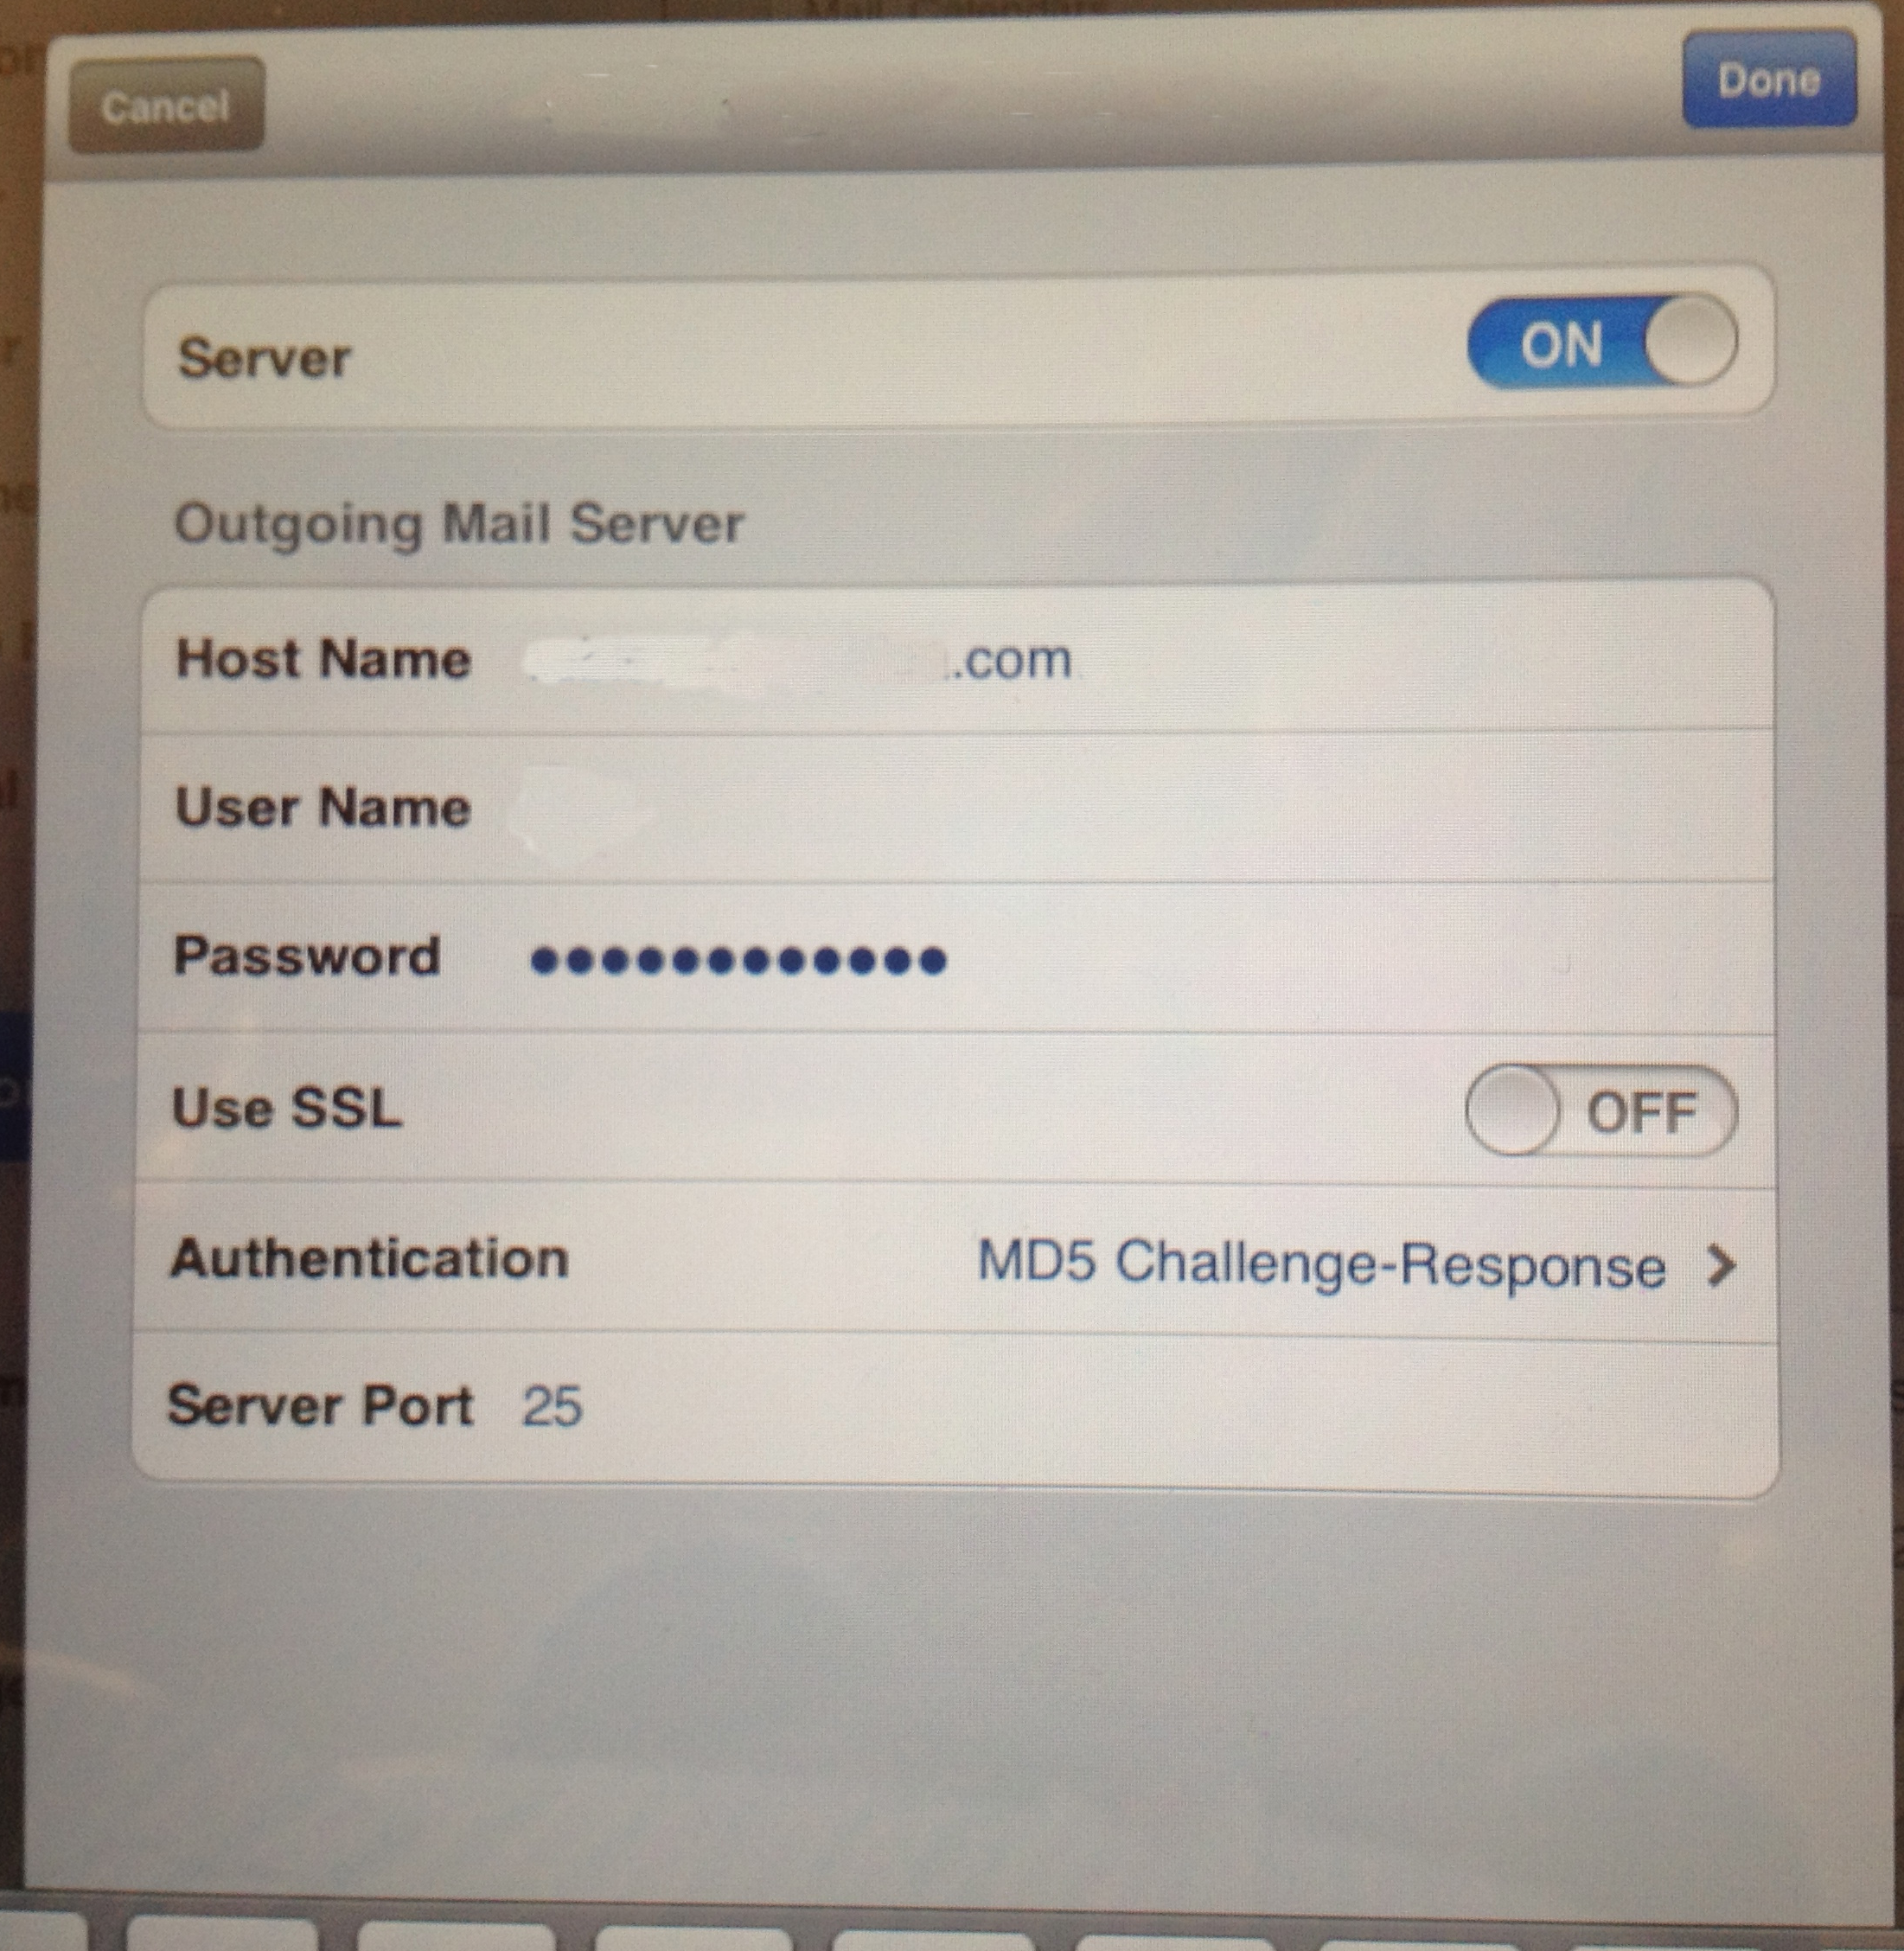
| 6 | As per notes on Items: 2b & 2c getting SMTP submission proxy up and running has with iOS devices 5.1.1 Devices has proved very frustrating and so far not meet with success. I have since realised that there is a simple work around solution to this problem and that is to simple configure the devices so its used standard public SMTP service (on Port 25). As per diagram above for iOS Device SMTP submission I have simply uses the "SMTP - Direct SMTP Submission" path for the device configuration. The public SMTP Port 25, which is used for all communications between SMTP Mail Transfer Agents (MTU) and is required to receive general email, is configured as a port on the "Firewall Router" which then forward SMTP traffic to port 25 on the internal "Mail Server". The disadvantage of using this solution is that it means that your email will traverse the internet in clear text and if you do not use one of the private password transmission mechanisms then even your password could be transmittted in clear text. To avoid clear text password submission, you should use MD5 Challenge/Response, using the "Outgoing Mail Server" SMTP mail server screen with "Mail, Contacts , Calendars" Settings option. See below for example:
NOTE: To configure MD5 Challenge-Response as an Authentication option requires you to have set up you Mail server with this option. |
Currently I am still testing various SMTP iOS 5.1.1 and Delegate options and to get correct configuration for SMTP mail submission from iOS devices. In meantime Item (6) above provides a current work around for iOS devices.
In doing the testing and configuration of Delegate I found the following page "Testing SMTP AUTH connections" very helpful
All materials are copyright (C) 2011, 2012 Graphica Software/Dokmai Pty Ltd
Send any questions or comments regarding this
site to info at graphica.com.au
Last Updated: Monday 19th May, 2012.
![]()