
The following notes provide a summary of what was needed to install OpenWRT (ver. 10.3 - Backfire) and CoovaChilli (ver. 1.2.5) to create an encapsulated WiFi HotSpot solution.
I have now done with wth Linksys WRT54GL (v1.1), WRT54GS (v3) & WRT54GS (v3 - modified to 64MB RAM) and am now testing a Netgear N600 (WDR3700)
I have complied this information together, as I could not find a consistent and easily followed set of instructions and guides on the OpenWRT Wiki/Forums (and Web) and so had to resort to various snippets of useful hints and information scattered around the web. I have tried to put these into a useful set of instructions, while maintaining reference to the original sources.
To start this exercise I initially purchased two WRT54GS (v3) routers. I made this choice based on reading the various specifications sheets from the WRT54G Series Wikipedia entry and the old OpenWRT and new OpenWRT Linksys hardware Wiki pages.
Based on the amount of Flash and RAM and relative hardware currency the WRT54GS (v3) looked like a good choice and there were a lot of them available new very cheaply on ebay, including ones which where modified to have 64MB RAM, rather than the standard 32MB. Though the modified models were advertised as running DD-WRT rather than OpenWRT.
As I started with one WRT45GS (v3) with DD-WRT installed the first thing I did was used the DD-WRT installation to reload the device back to factory default by loading Linksys firmware version WRT54GS (v3) 4.71.4001. This was simple to achieve using DD-WRT and Linksys Web Admin interfaces.
Next step was to load the WRT54GS (v3) routers with OpenWRT release. Based on information on the Web and OpenWRT forums it was not clear which version to use, as current supported devices had WRT54GS (v2.0) listed as supported but not v3. The supported wiki also lists all WRT54G variants as being supported by brcm-2.4 and brcm47xx targets.
Experimenting with both brcm-2.4 and brcm47xx targets here is summary of what I found worked (ie could be installed via standard Linksys Web Administration interface) and what did not:
| WRT54GS (v3) | WRT54GL (v1.1) | |
|---|---|---|
backfire/brcm-2.4/openwrt-wrt54gs-squashfs.bin |
successful |
not tested |
backfire/brcm-2.4/openwrt-wrt54g-squashfs.bin |
failed |
failed |
backfire/brcm47xx/openwrt-wrt54g-squash.bin |
failed |
successful |
backfire/brcm47xx/openwrt-wrt54gs-squashfs.bin |
failed |
not tested |
Once up and running the main visible difference appeared to be that WRT54GL has kmod-mac80211 (Athoeos) wireless driver reportings via Luci UI as radio0, while WRT54GS reported wireless via Luci UI as wlan0 and used kmod_brcm_wl (Broadcom) driver.
NOTE: beware of radio0 on WRT54GL as this is not the actual device interface you need to use when confguring WRT54GL Coova-Chilli HotSpot later...
Having got each of the WRT54G/L/S running with a Backfire OpenWRT version, I checked the modified WRT54GS (v3) to see if it was reporting 64MB of RAM. It was not. After some surfing it seems that to get WRT54 to recognise various RAM sizes you need to tweek the NVRAM settings. Once more there were many suggestions online on what values to set, at but I could not find a definitive statement which reflected my hardware configuration.
The NVRAM parameter are: sdram_init, sdram_ncdl, following this posting (which was for WRT54GL), I changed my NVRAM settings as follows (must either telnet or SSH into WRT):
nvram set sdram_init=0x0113

  nvram set sdram_ncdl=0x000

  nvram commit
I can report that this worked successfully and on reboot the modified WRT54GS (v3) reported 64MB RAM.
Initally the intention was to use Chillispot, as this appeared to have broad adoption. However on reading that Chillispot is now dormant and that Coova.org had taken up code and continued to fix and enhance this I decided to try CoovaChilli instead. As I wanted to establish both encrypted (at wireless link-layer) & secured access (WPA/WPA2) and unencypted secured access and was interested in WISPr (1.0 & 2.0) compliance this appeared to be the right choose.
NOTE: I have not looked at other captive portal solutions such as WiFiDog, NoCat, NoDog etc, as Chillispot and CoovaChilli appeared to be most broadly supported.
Before running Chillispot or CoovaChilli, you need to make sure that you have a number of critical network configurations completed and have installed some dependent package, the most critical being TUN/TAP Tunnelling Driver (kmod-tun). The TUN driver allows the Captive Portal software to get access to raw data packets from the physical device interfaces.
The topology I wished to support was as follows:
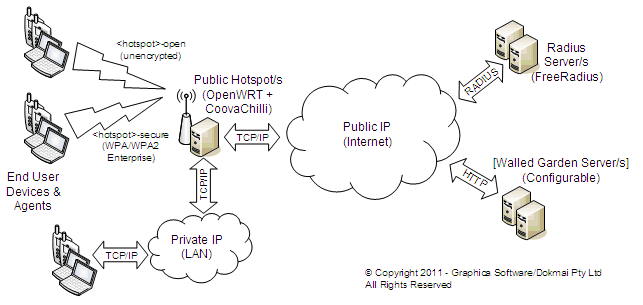
My target was to have two WiFi Networks available, one encrypted using WPA/WPA Enterprise and the other unencrypted (i.e. no WEP/WPA/WPA2 keys used). This was to allow for older hardware and different types of users. In both cases externally hosted RADIUS servers would be used and I wished to have the option of allowing optional and configurable Web Servers for the Walled Garden to allow non-authenticated uses to access a set of restricted sites. As the Walled Gardens where optional this meant that my OpenWRT configuration would need to run a very small set of web pages as well for handling Web/HTTP (Univeral Access Method or UAM) login.
The OpenWRT packages needed to support this is:
Package |
Responsibility | Mandatory |
|---|---|---|
kmod-tun |
Allows CoovaChilli to get access to network packets and hence control the captive portal |
Yes |
libcurl |
Provides URL parsing functionality |
Yes |
librt |
Provides timing functions for timestamp and time keeping, while this is not listed in the package build as mandatory, it is part of standard brcm47xx package (though not for brcm-2.4) and is listed within CoovaChilli Makefile LIB list. Added into CoovaChilli 1.2.0 to address issue with using time() function which does backwards across daylight savings change bounderies and improved performance. |
Yes |
haserl |
Mini Captive Portal Management system for when you wish to use WRT device to provide Web pages and handle HTTP login. Note that this will use "miniportal" scripts which do not make correctly with version of CoovaChilli built from source repository (see later section to help address this) |
No |
All of the various manufactor routers have a combination of an integrated ethernet switch and wireless devices. The way the wired ethernet switched is configured into into a set of Virtual LANs (VLAN). This allow one the device to be configured into WAN (Public Internet) and LAN (Private Network) facing ports with a number of routing schemes between them.
By default the WRT54 series devices have 1 WAN Ethernet port and 4 LAN Ethernet Ports with the Wireless Ethernet Access Device typically extending the LAN. To provide a WiFi based captive portal, the WRT54G needs to be configured so Wireless access is controlled via CoovaChilli while the LAN ports are available for use within private IP local area network.
This configuration is best decribed in this post by bisont87 on OpenWRT Wiki. The files that have to be used are:
To create CoovaChilli controlled captive portal the configuration changes are create a new network and get this connected up to the TUN driver.
The following commented version of the file shows the configuration I used and its variation across WRT54GL and WRT54GS.
| network |
|
| wireless |
|
| firewall |
|
NOTE: The naming convention for the WRT54GS configuration has the Wireless device name (wl0) consistent with actual software interface (wl0), as found using standard Unix "ifconfig -a" command. In the WRT54GL configuration the Wireless device name (radio0) bears no relation to software interface which is actually wlan0. In both cases the wifi interface (wifi-iface) is associated with underlying device by using "option device" where the device must be as specified in prior "config wifi-device" line.
The OpenWRT standard install package for CoovaChilli is version 1.2.2. I wished to build version 1.2.5 and so I had to create an OpenWRT build environment to create this.
The following HOW-TO information builds the basic Universal Access Method (UAM) part of the solution. The first step was to setup an Ubuntu VMWare instance to host this on. I followed the standard build instructions to get sources and to build my CoovaChilli package.
This involved the following steps:
| 1 | Establish Ubuntu VMWare instance | |
| 2 | Get additional packages required for OpenWRT build:
|
|
| 3 | Get Subversion source code control system: |
|
| 4 | Create build directory and checkout Backfire code tree: |
|
| 5 | Add the CoovaChilli feed (by following general feed and this CoovaChilli guidance) and edit the Makefile to fix issue with build and mmap
|
Note: this will pull in Makefile and startup script files from kamikaze build of coovachilli. This is most current OpenWRT build. The CoovaChilli build will not complete successfully by default. I found that the problem was with code included with Memory Mapped File were included (mmap). |
| 6 | Run build scripts and make the system (from top of backfire code tree):
|
This will make the entire code tree. The target architecture is selected using menuconfig. As I really only wanted to ensure I had valid CoovaChilli 1.2.5 build package built I selected it as optional component (M - build option). If you are installing to WRT54GL, which is very RAM constrained you might with to rebuild a base package without luci Web Admin included. |
| 7 | Copy coovachilli package to WRT54Gx for installation. The build package will be under <OpenWrt-Base>/backfire/bin/<arch>/packages/coova-chilli_1.2.5-1_<arch>.ipk .
|
I installed yafc (yet another ftp client) onto WRT54GS to allow me to get package onto router via FTP. Then you need SSH into box to install package. |
| 8 | Manually copy the Unix startup script to WRT54Gx, as this does not get correctly included in the built package. The file is in: <OpenWrt-Base/backfile/package/coova-chilli/files/chilli.init . It needs to be copied to WRT54Gx and moved to /etc/init.d/chilli Then once edit, enable init file on WRT54Gx using:
|
The Unix Chilli start up script if included with the feeds package files directory. However it is not correctly added into package. This file will also have to be edited to work correctly, as by default it has bugs. See example below. |
| 9 | Complete CoovaChilli configuration and start up the HotSpot:
|
See the sample configuration below for the files that need to be updated to correctly build config files |
The following configuration and build files have to edit to get system up and running:
Examples files and edits made are provided here (with source available via link):
| Makefile |
|
| chilli |
|
| config |
|
<To be Completed>
While loading the OpenWRT firmware is a straight forward excercise, using the Web Adminstration interface, restoring the router back to factory firmware can be very frustrating, The process is to use trival FTP client (tftp) to put a new firmware version on the box, as described here under "Using the TFTP method". However before doing this you need to ensure that the following NVRAM settings are configured (via Telnet/SSH):
# nvram set boot_wait=on

    # nvram set boot_time=5

    # nvram commit
Also ensure that OpenWRT box is configured to use 192.168.1.1/255.255.255.0 as its LAN address and then configure the computer that LAN port is connected to with a static IP address in range between 192.168.1.5-20/255.255.255.0 with 192.168.1.1 as default gateway. No DNS server configuration is required. I also reset the adminstration password back to "admin" the Linksys default.
Next start up tftp server (Linux, FreeBSD, Mac OS X) and prepare for for transfer...
> tftp 192.168.1.1

  > binary

  > trace

  > put <firmware-file-on-local-disk>
Then immediately plug power into to router.
My experience is that this method is very hit and miss and may require a number of attempts. I have found a simpler work around that involves using DD-WRT.
In this case simply find the appropriate "small" DD-WRT firmware for the router and upload this via OpenWRT Web Admin interface. For some reason OpenWRT firmware update will accept the DD-WRT firmware but not the Linksys factory firmware. Then once the box has rebooted it is possible to use the DD-WRT Web Admin interface to load the Linksys factory firmware back into router. This method is much less time consuming and frustrating than TFTP one. It also highlights a key issue with OpenWRT firmware, which is its ability to easily load new firmware.
All materials are copyright (C) 2011 Graphica Software/Dokmai Pty Ltd
Send any questions or comments regarding this
site to info at graphica.com.au
Last Updated: Tuesday 19th May, 2013.
![]()